|
|
|
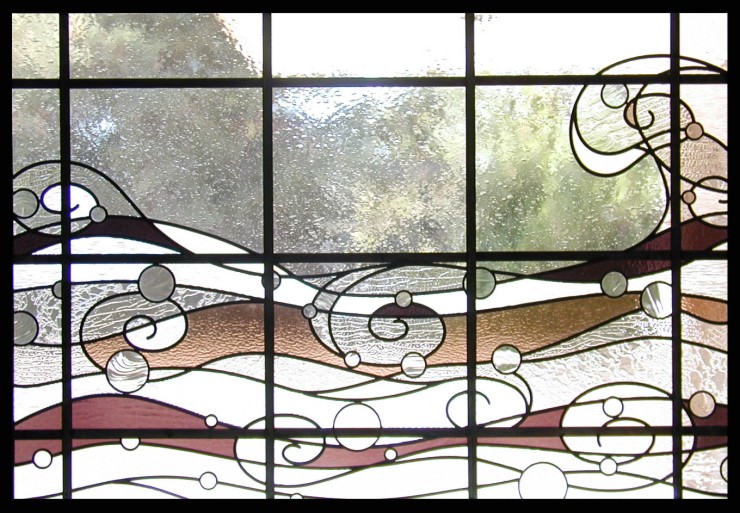
This abstract ocean wave
stained glass window is one I did for the master
bathroom of
a home being remodeled extensively. The window is constructed with 3/8"
lead came, except for the "bubbles," which are done with 1/4" lead
came. The thick-line grid of horizontal and vertical lines was
constructed with 1" H-zinc came. It was necessary to design in this
rigid grid of zinc lines to give strength to this 4 foot by 6 foot
window. The 1" vertical lines also hide 1/2 steel reinforcement bars
that are soldered to the back side of this artwork. The image above
shows the window already installed. The colors are a bit off... the
reddish-brown "wave" near the bottom is actually a cathedral
(see-through) gray, and the black areas near the top of the waterline
are the same cathedral gray glass. Although some of the waves are done
in an opaque (not see-through) offwhite glass, many of the textured
clear glasses appear white as well, especially near the bottom of the
image. To see a better photo of the clear textured glasses, see the one
at the bottom of this page that shows the matching toilet room window.
An interesting aspect of this project is that the abstract ocean wave
design was
a last minute change from a completely different design, depicting
ferns and bugs. The client called me just as I was getting underway
with drawing the full-size pattern of the ferns and bugs design to say
that she thought that design
might be too colorful. She came to my studio to look at the glasses we
had selected, whereupon she was sure that there was too much color
for her master bathroom. I suggested that floral designs are often
colorful, and the best solution might be to
re-design these
windows altogether. She was open to that as long as the design was more
flowing than the more geometric designs I had already crafted for other
places
in her
home. I immediately thought of this design, which I had first come up
with years before as a submission for a public art project that I did
not get. When I showed it to her on my computer, she was immediately
smitten with the flowing aspect of the design, the option to use far
less colored glass, and the way this design would complement her
oversized bathtub. I was very glad to
switch designs as I had always loved this design and hoped I would get
the opportunity to use it someday.
.
|
 |
Because I do not relish making panels that are as big as this 4x6 foot window (they're
a nightmare to make, transport, and install) and do not recommend them
for stability reasons as well, I decided - early on with the ferns and
bugs design - that I would make this window in two parts.
This
is always a difficult option to
bring off correctly, so that the transition from one panel to the next
looks flawless. To begin with, I designed in the grid of thick
horizontal and vertical lines (made with sturdy one-inch H zinc). This
grid would not only allow for the window to be made in two pieces, it
would also hide the steel support bars I intended to solder to the back
side of the stained glass.
.
|
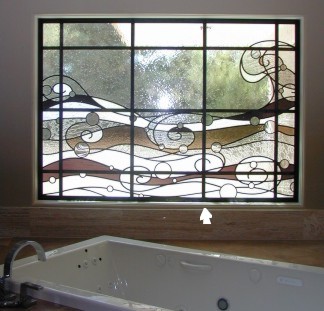
The
third vertical line from the left (indicated by the white arrow) became the transition point between
the two pieces. On the larger panel (the left side), I used the
one-inch zinc. On the smaller panel (the right
side), I used the tiniest simple-U zinc came available, so thin that it
slips right into the channel in the large one-inch zinc. I also cut the
last 1/2" out of the heart of the lead pieces that come up to
this tiny zinc so that I could
taper the height of these lead pieces to where they, too, would slide
into the large H zinc. And finally, I filed down all of the solder
joints along the tiny zinc so that they could slide into the large H
zinc as well. The panels were so large and unwieldy that I could not
check the fit between the tiny zinc on the right panel and the large
zinc on the left panel, but I trusted that I had done all I could to
insure the fit.
.
|
I mounted the large panel first,
making sure it was securely in place so that I could push hard on the
second panel, if necessary, to get it to slide into place. Fortunately,
because I had measured carefully and taken the precautions outlined
above, the second panel slid into the waiting channel of the first
panel without much effort. And the overall fit was perfect!
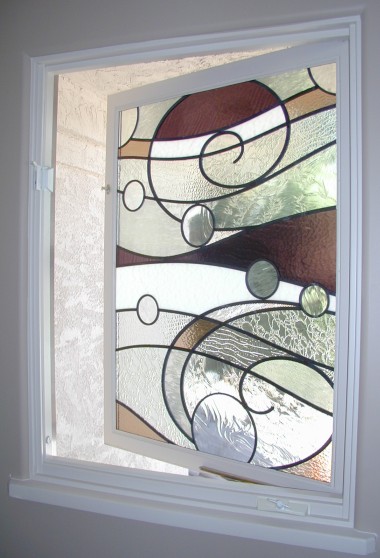
> > > The image to the right shows a matching abstract ocean wave
stained glass
that I did for the separate toilet room of the same master bathroom.
It is also done with 1/4" and 3/8 inch lead, although this smaller
example of the abstract ocean wave does not need the heavy 1"
zinc lines.
Here, too, the dark brown glass is really the same cathedral gray.
This is a good example of stained glass in an opening window. As you can
see, the stained glass is mounted into the opening part of the window
(without removing the clear glass that was there already) so that the
option to open the window is not lost. |
|
Return to the
Gallery 
|